Simple Photo De-duplication with PowerShell

After several failed attempts and false starts over the course of the last decade or so, this summer I vowed to finally get my wife's photo library and my own properly merged. For various reasons, we both had large libraries of photos from various events and vacations which had a lot of overlap, but not 100% overlap.

This meant I needed to examine two large collections of photos and copy all of the non-duplicate photos from one to the other. And I couldn't rely on file names or paths at all, because my wife is good about renaming and organizing her photos, while I am not. So I whipped up a PowerShell script to gather the SHA-1 hashes of every file; by comparing them all, I could find and ignore the duplicates. It's not perfect - it'll only find pictures which are exact duplicates. If my collection has the original and my wife's collection just has the "red-eye reduction" version, we'll end up with both in the final collection. But it considerably reduced the amount of de-duplication work we have to do by hand.

Here's the function which actually gathers all the photo data for a folder (and all its child folders):

function Get-PhotoData {
    param([string]$path)

    $results = @()

    $files = Get-ChildItem $path -Recurse -Filter *.jpg 

    $total = ($files | measure).Count

    $files | % {$i=1} {
        Write-Host "Processing $_ ($i of $total)"

        $props = @{
            Name = $_.Name
            Path = $_.FullName
            Size = $_.Length
            Hash = (Get-FileHash $_.FullName -Algorithm SHA1).Hash
        }

        $results += (New-Object PSObject -Property $props)
        $i++
    }

    $results
}

I ran that function against my wife's photo collection (which was effectively our master collection) and my own:

$master = Get-PhotoData -path $masterPath
$toMerge = Get-PhotoData -path $toMergePath

In theory, I could then have used Compare-Object to figure out which items in my collection were safe to delete (i.e., they already existed in my wife's collection):

$safeToDelete = Compare-Object -IncludeEqual -ExcludeDifferent -ReferenceObject $toMerge -DifferenceObject $master -Property Hash -PassThru | Select-Object -ExpandProperty Path

This would give me a list of paths to photos in my collection which had a matching SHA1 hash to a photo already in my wife's collection.

Or, I could find the list of items in my collection which were missing from her collection:

$toMove = Compare-Object -ReferenceObject $master -DifferenceObject $toMerge -Property Hash -PassThru | ? { $_.SideIndicator -eq '=>' } | Select-Object -ExpandProperty Path

Moving each item in that collection would then be easy:

$toMove | % {$i=1} {
    Write-Host "Moving $_ ($i of $total)"
    Move-Item $_ "[destination path]"
    $i++
}

For small enough collections, this works great. But if you've got a large enough photo collection you might start running into performance problems with Compare-Object. If that's the case, with a little extra effort and a little bit of Python you can figure out your $safeToDelete list much faster. First, we dump our photo data to a couple of files:

$master | Select Name, Path, Size, Hash | Export-Csv -NoTypeInformation "master.csv"
$toMerge | Select Name, Path, Size, Hash | Export-Csv -NoTypeInformation "toMerge.csv"

Now we throw together a quick Python program using pandas to read in the two data sets, merge them into a single data set by matching on the file size and hash, and dump the output to another file:

import pandas as pd

# Read in our email data file
master = pd.read_csv('../master.csv', header = 0)
toMerge = pd.read_csv('../toMerge.csv', header = 0)

both = pd.merge(toMerge, master, on=['Size', 'Hash'])
both.to_csv('../safeToDelete.csv')

The new .csv file will have columns 'Path_x' and 'Path_y'; since we had toMerge as the first parameter to merge, Path_x is a list of all the files in that collection which can be deleted. More Python-savvy folks than me can probably handle the deletion straight from the Python script, but I just did it with PowerShell:

$toDelete = (Import-Csv .\safeToDelete.csv).Path_x

$total = ($toMove | measure).Count

$toDelete | % {$i=1} {
    Write-Host "Deleting $_ ($i of $total)"
    Remove-Item $_ 
    $i++
}

Of course, don't go running any of this code or deleting any files until you've backed your folders up somewhere safe; if you make any mistakes (or any of my code is totally broken), you'll want a safety net in place.
How Long Would It Take To Read All My Email?

This is part of a series on mining your own Gmail data.

For this post I want to tackle a fun question: how long would it take to read all of my email if that's all I did, 24/7? It's one of those questions that should interest anyone who's concerned about information overload or is looking to pare down their information consumption: "Just how much of my time is theoretically committed to my inbox?"

First, the obvious: nobody actually does this. No one actually reads every email they receive from start to finish (as anyone who's dealt with email in a corporate environment knows all too well). Most of us have filters (both electronic and mental) set up to glean the info we need and skip the rest.

And I'll bet that a lot of email is written without any expectation that the whole thing will be read; the author may be well aware that different portions of the email are relevant to different recipients, or that the email itself will only be interesting to a subset of the mailing list (e.g., many marketing emails).

So it's not the one super-relevant data point that should make people completely re-think their information consumption habits or anything like that. But it is fun to think about, and as one data point among many others it might prove interesting or useful.

On to the fun part - actually coming up with a number!

Like most people, I'm getting new emails all the time. So technically I should be taking into account all the new emails I receive while I'm still reading through my old ones. But that's hard, so I'm not going to bother. Instead, I'm just going to assume I've stopped getting emails at all while I'm reading. Which means that getting a basic number is easy - I just have to count all the words in all my emails, divide that by the number of words per minute I read, and I've got the number of minutes it would take to read everything.

The first thing I need to do is go back to my PowerShell script and pull in the body of each email. This is where we hit the first snag - HTML emails.

For doing word counts, I really don't want to look at HTML emails, because there's a ton of junk in there which a human won't be reading. Luckily, most email clients which send HTML emails also include a text version; in those cases, we'll just extract that text portion of the email and ignore the HTML. Unfortunately, this isn't always the case; when there's not a text version available, we'll just have to get the HTML and figure out how to deal with it later.

As usual, MimeKit will be doing most of the work. This version of the script is pretty similar to our previous ones, except that we have to loop through the possible body formats for each message to figure out which formats are available. We always check for the 'Text' format first, because that's the one we really want. If that's not available, we run through the others until we find one that works.

The relevant changes are the hash of the possible formats, which we use for iteration and for tracking the number of emails of each type:

$formats = @{
    [MimeKit.Text.TextFormat]::Text = 0; 
    [MimeKit.Text.TextFormat]::Flowed = 0;
    [MimeKit.Text.TextFormat]::Html = 0; 
    [MimeKit.Text.TextFormat]::Enriched = 0; 
    [MimeKit.Text.TextFormat]::RichText = 0; 
    [MimeKit.Text.TextFormat]::CompressedRichText = 0
}

And the section where we determine what the actual format is and store it:

    $bodyText = $null
    $actualFormat = $null

    # Run through all the enumeration values
    # The pipe through sort ensures that we check them in the enum order,
    # which is great because we prefer text over flowed over HTML, etc.
    $formats.Keys | sort | % { 
        # try each Format until we find one that works
        if($actualFormat -eq $null) { 
            # Try to get the body in the current format          
            $bodyText = $mimeMessage.GetTextBody($_)
            if($bodyText) {
                $actualFormat = $_
            } 
        }
    }

    if($actualFormat -eq $null) {
        $unknownFormat += 1;
        $actualFormat = "Unknown"
    } else {
        $formats[$actualFormat] += 1;
    }

You can find the full script here.

A couple of notes:

  1. This isn't perfect; sometimes MimeKit can't really figure out what the format is. For example, I have some Skype notification emails which MimeKit thinks are HTML only, but are in fact text. I'm not sure why MimeKit gets confused (probably incorrect headers in the original emails), but out of about 43,000 emails only a couple dozen seem to have issues, so I'm not going to worry about it.
  2. In all of my emails, the only two formats returned were Text and HTML. This might have something to do with what Gmail supports; I've seen some posts that suggest Gmail doesn't support Flowed, though those may be outdated. In any case, I'm only really dealing with Text and HTML in my word counts.

Once we've got the data, we can load it up in pandas and do some counting. Doing a naive count of the words in the plain text emails is trivial; we just define a method that uses Python's split method with None as the delimiter argument, and then look at the length of the returned list. Here's what textWordCount looks like:

def textWordCount(text):
    if not(isinstance(text, str)):
        return 0

    return len(text.split(None))

But the HTML emails are problematic because most of the content is markup that the user will never actually read. So we need to strip all that markup out and just count the words in the text portions of the HTML. To do that, we create another method which parses the HTML email content using the amazing Beautiful Soup library, strips away the style, script, head, and title parts, and extracts the text from what's left using get_text(). Once we've got the actual human-readable text, we can run it through our usual word counting method:

def htmlWordCount(text):
    if not(isinstance(text, str)):
        return 0

    soup = bsoup(text, 'html.parser')

    if soup is None:
        return 0

    stripped = soup.get_text(" ", strip=True)

    [s.extract() for s in soup(['style', 'script', 'head', 'title'])]

    stripped = soup.get_text(" ", strip=True)

    return textWordCount(stripped)

I took a couple of online tests to get an idea of how fast I read and came up with 350 words per minute. With that bit of data, we can now add some more columns to our data and figure out the total time to read all the emails:

def wordCount(row):

    if(row['Format'] == 'Html'):
        return htmlWordCount(row['Body'])

    return textWordCount(row['Body'])

averageWordsPerMinute = 350

# Count the words in each message body
emails['WordCount'] = emails.apply(wordCount, axis=1)
emails['MinutesToRead'] = emails['WordCount'] / averageWordsPerMinute

# Get total number of minutes required to read all these emails
totalMinutes = emails['MinutesToRead'].sum()

# And convert that to a more human-readable timespan
timeToRead = humanfriendly.format_timespan(totalMinutes * 60)

The full script is here, if you're playing at home.

Running that against all of my Gmail gives me:

>>> timeToRead
'2 weeks, 6 days and 18 hours'

So if I sat down and read at my fastest speed 24/7 for three weeks straight with no breaks, no sleep, and never slowing down, I could finish reading every word of every email I've ever received in my Gmail account. If I only read them 8 hours a day, it'd take me about 9 weeks to finish.

That's actually less than I expected, though "two whole months of your life spent just reading your email" is a still a bit sobering.

Sobering enough that I'm not going to try to compute this for my other four email accounts, anyway.

Mining Your Gmail Data - Part 6

First off, let's take a look at the second question that came up at the end of the last post: ignoring the Media Type (the 'application/', 'video/', etc.) from the MIME type.

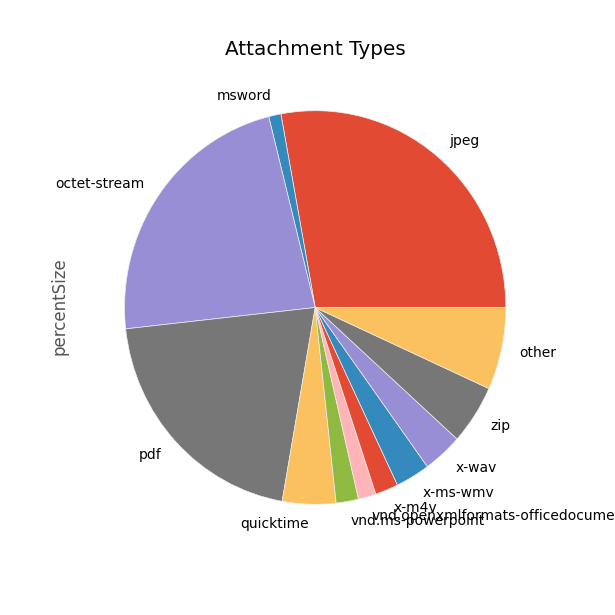
That turns out to be pretty easy - the script from last time already collected that data, because MimeKit already made it available. We just need to adjust our pandas script to group on 'MediaSubtype' instead of 'MimeType':

types = notFromMe.groupby(['MediaSubtype'])

Attachment Types by %

That cleaned things up a lot. But we still have the second question from the last post: what's behind octet-stream?

Application/octet-stream is basically the generic binary file option; most likely the original client which uploaded the file didn't specify the type. But we can make an educated guess about the type based on the file name extension, where we have it. So we'll write a quick function which takes a row of data and, if the Media Subtype is 'octet-stream', returns the file name extension from the FileName column:

import os.path

...

def filetype(row):
    if not(isinstance(row['ContentTypeName'], str)):
        return ''
    if row['MediaSubtype'] == 'octet-stream':
        return os.path.splitext(row['ContentTypeName'])[1]
    return row['MediaSubtype']

We can run that function against our data and put the results in a new column which we'll call 'FileType':

notFromMe['FileType'] = notFromMe.apply(lambda row: filetype(row), axis = 1)

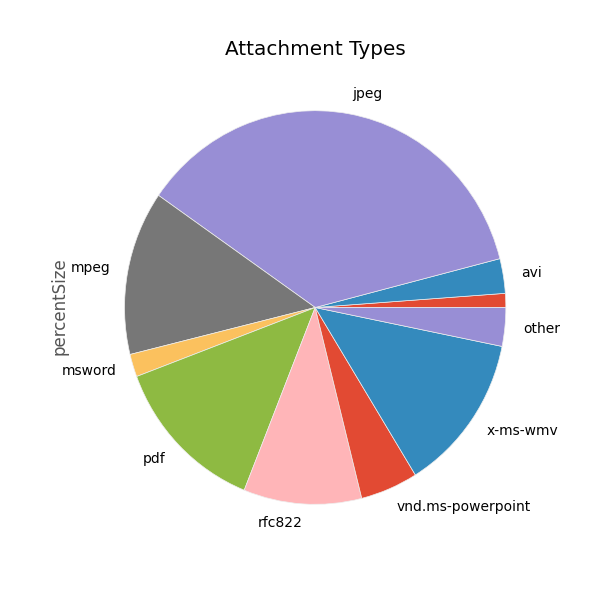
Now, instead of grouping by MediaSubtype, we just group by FileType. This isn't perfect - some of our data is getting discarded because there's not enough info between Media Subtype and FileName to figure out what kind of attachment it is. But the data is mostly good, and gives us a much more useful chart:

Attachment Types by %

I'm also running this chart with a threshold of 0.02 for the 'other' section, to clean up the less-frequent file types. The whole script can be found here.

So, if I'm looking to downsize my Gmail backup, I should probably concentrate on JPEGs, videos (wmv and mpeg), and PDFs.

Mining Your Gmail Data - Part 5

Last time I talked about mining my Gmail data, I figured out that most of my received attachments (by size) were from friends and family. This time I'm going to break down the data a little more so I can figure out what types of data are in those attachments. On a practical level, I could reduce my Gmail backup size by deleting old messages with photos I already have backed up elsewhere. In reality, I just want to screw around with the charting capabilities in pandas.

This time I need all the data broken down by individual attachments. The script for this is similar to the last one, but instead of aggregating the attachments per message, I'm keeping them separate. I'm also grabbing some additional data, like the MIME type of each attachment and the file name. And because I'll need counts of individual attachments, I need to make sure I've got a unique ID for them. I can't use the message ID, because a single message can have multiple attachments. And I can't use the file name, because that may be repeated across messages. So I'm concatenating the two into a new field called AttachmentId. I'm also ignoring all the emails without any attachments. Here's the new script:

$emails = @()
$gmvaultdb = "C:\Users\hartez\gmvault-db\db"
$total = (Get-ChildItem $gmvaultdb -Recurse -Filter *.eml | measure).Count
Add-Type -Path "MimeKit.1.2.10.0\lib\net45\MimeKit.dll"

Get-ChildItem $gmvaultdb -Recurse -Filter *.eml | ForEach-Object {$i=0} {
    Write-Host "Processing $_ ($i of $total)"
    $mimeMessage = [MimeKit.MimeMessage]::Load($_.FullName)
    $attachments = @()

    $mimeMessage.Attachments | % {
        $attachment = @{
            Id = $mimeMessage.MessageId + $_.ContentDisposition.FileName
            FileName = $_.ContentDisposition.FileName
            ContentTypeName = $_.ContentType.Name
            MimeType = $_.ContentType.MimeType
            MediaType = $_.ContentType.MediaType
            MediaSubtype = $_.ContentType.MediaSubtype 
            Length = $_.ContentObject.Stream.Length
            ContentType = $_.ContentType
        }
        $attachments += (New-Object PSObject -Property $attachment)
    }    

    $mimeMessage.From.ToString() -match '"\s<(.*)>$' | Out-Null;
    $fromEmail = $Matches[1]

    if($attachments.Count -gt 0) {
        $attachments | % {
            $props = @{
                Id = $mimeMessage.MessageId
                To = $mimeMessage.To.ToString()
                From = $mimeMessage.From.ToString()
                FromEmail = $fromEmail
                AttachmentId = $_.Id
                FileName = $_.FileName
                ContentTypeName = $_.ContentTypeName
                MimeType = $_.MimeType
                MediaType = $_.MediaType
                MediaSubtype = $_.MediaSubtype 
                Size = $_.Length
                ContentType = $_.ContentType
            }
        }

        $emails += (New-Object PSObject -Property $props)
    } 

    $i++
}

$emails | Select Id, To, From, FromEmail, FileName, AttachmentId, ContentTypeName, MimeType, MediaType, MediaSubtype, Size, ContentType | Export-Csv attachments2.csv -NoTypeInformation

In pandas, I'm doing the usual import of the data and filtering down to messages which aren't from myself. Then I group the data by MIME type:

    types = notFromMe.groupby(['MimeType'])

and create aggregate columns for the total number of attachments of each type and the total size of those attachments:

    types = types.agg({'AttachmentId' : 'count', 'Size' : 'sum'})

I'll also need the total number of attachments and the total size of all attachments so I can calculate percentages:

    totalCount = types['AttachmentId'].sum()
    totalSize = types['Size'].sum()

With that in place, adding the percentage columns is easy:

    types['percentCount'] = types['AttachmentId'] / totalCount
    types['percentSize'] = types['Size'] / totalSize

At the top of the script I've already imported matplotlib:

    import matplotlib.pyplot as plt
    plt.style.use('ggplot')

Now we're all set to plot this data so I can see the relative sizes of each file type. I'll start with 'percentSize':

    types['percentSize'].plot(kind='pie', figsize=(6, 6))
    plt.show()

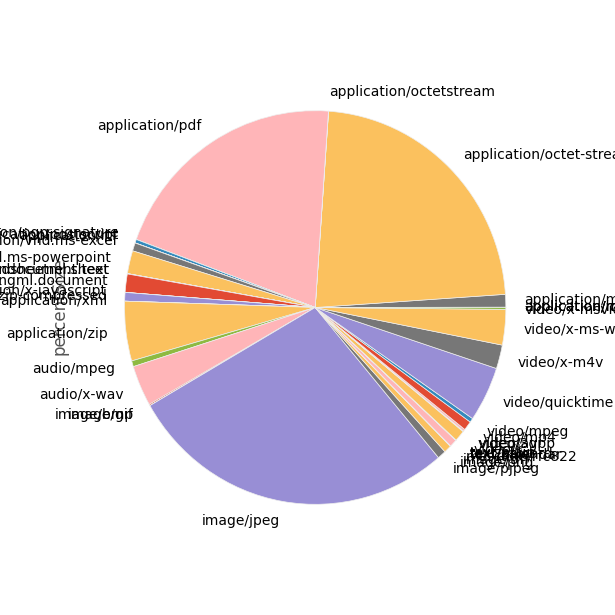
Attachment Types by %, First Try

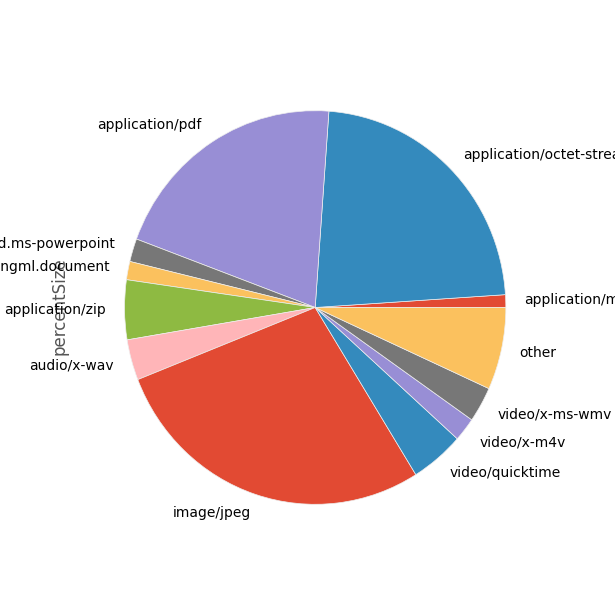
Wow. That's ... pretty ugly. Let's see if we can un-clutter that a bit by combining all of the really low-percentage stuff into a slice called "other". While we're at it, we'll create a method that we can re-use when we want to graph the percentages by count:

    def combinedPlot(df, col, cutoff):

        # Just get the mime types which are 1% or more
        overCutoff = df[col]
        overCutoff = df.query(col + '>' + str(cutoff))

        # Fill in the 'other' section
        remaining = 1 - (major[col].sum())
        other = pd.DataFrame({col : pd.Series([remaining], index = ['other'])})

        # Add the 'other' section to our main data
        both = overCutoff.append(other)

        # Plot it
        both[col].plot(kind='pie', figsize=(6, 6))
        plt.show()

To use it, we just drop in our types data frame, the column we want to graph, and where we want to cut off the data:

    combinedPlot(types, 'percentSize', 0.01)

Attachment Types by %, Cleaned Up

That's much better. But it raises a couple of questions:

  1. What's with application/octet-stream? That could be any sort of file; can we dig down into that?
  2. Can we get some more succinct labels? We don't really need the 'application/; and 'video/' prefixes.

This is already long; we'll get to those questions next time.